Anatomy of a whiteboard diagram
Recently, our friend Peter Shirley speed-wrote a technical book, about how to write rendering software. He also wrote about the process of speed-writing a technical book. His goals were to show that 1- writing high quality rendering software is fun and can be done easily and quickly, and 2- writing a technical book can also be fun and done easily and quickly.
Normally, a big chunk of the time it takes to write a technical book has to be devoted to images and diagrams; they’re hard to do well, and the software you need to make them is specialized. Pete decided to use Limnu to make hand-drawn technical figures for this book, because even though highly produced and perfected diagrams done in Adobe Illustrator may be beautiful and flawless, they rarely contain any informational or conceptual improvements over the hand-drawn whiteboard or blackboard drawings you get from a professor during a class lecture. Sometimes they can actually be worse.
Pete wanted his whiteboard diagrams to be at least presentable, and asked us for advice about how to, with minimal effort, make his Limnu drawings look a little better. So I set about trying to reproduce his figures. Here’s a quick breakdown of the process I used and the results, and at the end are a few reflections and general advice.
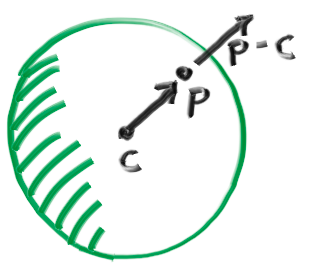
Exhibit 1: Calculating the normal to a point on a sphere.
This is a perfectly good diagram! Pete started with a circle with some cross-hatching to give it the appearance of a sphere. There are 3 pieces of information that need to be conveyed: the center point of the sphere, a point on the surface, and the normal that extends outward from the center through the surface point. It conveys all the information we need. But, it can also be improved.
First off, drawing perfect circles by hand is really hard. Professional artists know this, and they either practice a lot, or avoid doing it. On a whiteboard, you can either draw it quickly and imperfectly, or you can go slowly and get a nice circle but end up with a wobbly line. Even a traced circle doesn’t work very well.


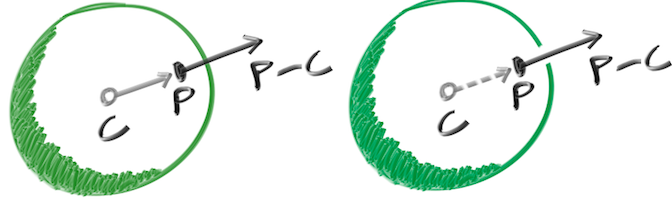
At point C, I drew an open circle, and at point P I drew a solid point that is slightly smashed to add a little bit of foreshortening effect, a detail to sell the idea that P is on the surface of the sphere. It wasn’t calculated or drawn carefully at all, the dot is simply taller than it is wide and angled a little. Finally, I made the cross-hatching a little less prominent, just to keep it out of they way, and the letters are a little bigger. The vectors are angled more to the right so they don’t add to the overall height. Here’s the final before and after:
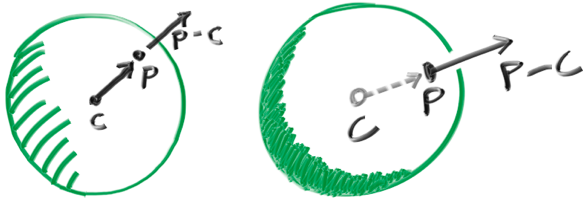
There is no more information in the new version, but Pete liked the change, so we’ll call it an improvement. Here are the lessons we learned:
- Do draw fast & smooth, don’t try to be careful or go slow.
- Don’t spend all day trying to be perfect, but do feel free to use undo.
- Do use the eraser tool to break lines, rather than drawing separate lines.
- Do use color and shape to show depth layering.
After he thought about it, Pete noticed these are the things he already does on a real whiteboard, and that using his computer causes him to think differently and draw differently than when he’s at a whiteboard having a conversation. All in all, we can boil what we learned down to: pretend you’re at a real whiteboard.